Preparing Silk Gauze for Stitching
Preparing your cut of silk gauze takes just a few minutes, and you need only a scrap of fabric such as muslin, printed cotton, etc. This method allows you to stitch using a hoop, Q-snap, or scroll frame - whichever is your preference.
Some like to mount the gauze to a cut of matboard. It's definitely a personal preference, but I have so much fabric at hand and stitching it down ensures the gauze won't shift as I work.
Before we start...
First, a note about the silk gauze: the cut of gauze provided in my chartpaks is sized for that specific project with the understanding that you will begin stitching in the center. You don’t have to start in the center, but it is my preferred method to ensure an even space around my finishing stitching.
You will find a gallery of images at the bottom of the page - click through those for larger photos.
Step 1
Silk gauze is a natural fiber, thus there will be the occasional flaw, but I work to ensure no serious flaws are present in the cuts I provide. I’ve purposely used a cut here which has a darker line in the weave - do you see it? In most cases small discolorations similar to this are not an issue at all because your solid stitching covers it entirely. However, if you are finishing your piece in a way where some of the unstitched gauze will show, you don’t want a discoloration such as this one to extend into that space.
Step 2
To mount the gauze, cut a piece of your scrap fabric so it’s large enough to fit comfortably in your hoop - 9" is a good size for most of my projects. I like to use pinking shears so I’m not fussing with stray threads as I stitch. Center the silk gauze on the printed or darker side of the fabric - you can pin in place if you like. This does not need to be precise and after you do this a few times, you won’t need to pin.
NOTE: For a larger project, simply cut your fabric allowing 2-3” all the way around your cut of gauze.

Step 3
Go to your sewing machine and begin at one corner. You can hand stitch this if you don’t have a machine; no need for tiny, precise or counted stitches, but they do need to be secure.

Step 4
Sew around all four sides of the silk gauze, keep both layers flat. I use what is termed an “overcast” stitch on my machine; a zig-zag stitch or similar stitch is fine. Don’t set your stitches to tight! You simply don’t need them that tight, and you will likely pick them out when you complete your stitching.

Step 5
Here is what mine looks like when I’m done. You will notice I also don’t worry about matching the thread in the sewing machine - I just use whatever is already loaded.

Step 6
Next, you want to ‘pinch’ the fabric and the gauze at the center and separate the layers. This photo shows the gauze ‘side’.

Step 7
On the fabric side, where you have pinched and pulled the layers apart - snip the fabric layer ONLY near the center (it's hard to illustrate when I'm taking my own photos!). Be careful not to cut into the silk gauze!

Step 8
Using that small snip in the fabric layer as a starting point, continue cutting through the fabric layer ONLY to one corner.

Step 9
Now, carefully cut the fabric away along all four sides to create a window, exposing the silk gauze. Keep checking as you go so you don't cut through the silk gauze layer. You can discard that fabric cut-out.

Step 10
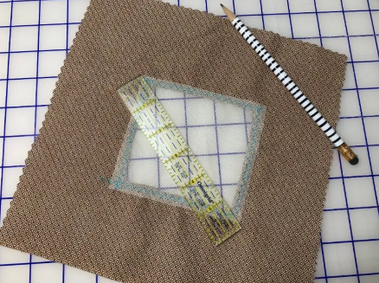
Flip everything back over to the side where you stitched the gauze onto the fabric. With a straight edge placed corner to corner on the gauze, make a short pencil line near the center.

Step 11
Repeat by moving the straight edge to the other corners and marking the center - creating an 'X'.

Step 12
You should have a small ‘X’ marking the center point in your silk gauze. You will be stitching right over this as you work the design. Just don’t make the lines so long that they extend into the outside edges where you won’t be stitching.

Step 13
You are ready to begin! Place in your hoop (this one is 6”), Q-snap or frame and enjoy every stitch!

A few final notes...
-
Depending on how you plan to finish your project, you can cut the gauze away from the fabric right along the edges. If framing, I recommend you pick those mounting stitches out to allow your framer plenty of ground cloth to work with.
-
If stitching a much larger project you can move your hoop around on the gauze as long as you don’t leave the hoop in place when you aren’t working.
-
This is my preferred method of preparing my gauze to stitch. I have a plentiful supply of fabric scraps and it stays put as I work. Diagrams are also included in my chartpaks.